Monday, 3 November 2014

DIY Elsa costume

Halloween 2014 

It seems as though frozen is a craze that will never end, and I am I full supporter. I love all things disney related, hip and urban I know, and frozen is just the icing on the cake. I could actually cry at how much I love it. I just have to think of olaf and my mood is lifted. So it seemed fitting that for Halloween this year, I went as Elsa. I put a substantial amount of effort in and I was pretty pleased with the finished result. I made the dress and cape myself and wore with sparkly sandals to add the extra delight that comes with all things glittery. 


I primed my skin with this w7 primer, a dupe of smashbox. I have to say, for £1.99 it does an excellent job, I can't complain. 
               
Since Elsa is the snow queen, I wanted my skin to be really pale. This isn't difficult when you're from the north of England and by nature have an anaemic-like complexion. 
                      
I then applied my Dainty doll concealer all over my face to look even paler- I too was shocked that this was possible. 
                      
This seventeen foundation is a bit too light for my skin and is really thick, so it was great for this look. I applied with my real techniques stippling brush all over my face and neck and the transformation to albino was complete. 
                      
I went with a REALLY dark blush for this for that 'I've just been frolicking in the snow and that' look. This blusher is a bit too strong for everyday wear but great for things like this. Then it was time for the exciting bit; highlighter. Oh boy, oh boy how I love a highlighted cheekbone. 
                      
                      
Obviously I went with the staple mac soft and gentle and benefit high beam. You don't mess with a classic. 
                       
I had to get creative when it came to the eyes. As it isn't 2002 anymore and people don't really wear pink eyeshadow daily, I had to use two shades of lipstick on my eyelids to get the lovely pink look that elsa has. I went with this lilac topshop colour and a hot pink from the Kate moss rimmel range. 
                       
                                    
I applied the lilac all over my eye lid and put the pink into my crease. I then put this dark purple shade that I have in a palette of eyeshadows over the crease. 

                                   
I went with my favorite red cherry lashes (no 43 if you're wondering) and an excessive amount of glitter on the side of my face to finish it off. 


I simply plaited my hair to one side and wore a clip in fringe backwards to give those faffy little bits elsa has at the front, so I didn't have to wear a full wig. It worked rather well If I say so myself. The only full length picture I have of the dress itself is with my friend, Luke, who went as Amish man, and Hannah who went as a bat. 
                                     
All in all, a pretty easy diy costume and a rather hilarious Halloween. 

Emma x


Wednesday, 29 October 2014

Edinburgh for the day.

Train delays and soy lattes. 

A brisk awakening was necessary this fine Wednesday morning; my grandma, cousin and I were Edinburgh bound. I found myself awake at 5:30am, too cold to sleep, and ready by 6am. Talk about organised. After some brief faffing and a spot of breakfast, we marched from my grandmas house to the metro station, braving the freezing temperatures and paying extortionate prices for single tickets to the train station.
(£2.60??? I nearly died!) 
In central station and 20 minutes early, we were rather chuffed, wasting time buying chewing gum and overpriced coffees. But this joy at our organisational skills didn't last long - delays. First a ten minute delay, then twenty then false hope as it fell by a minute, only to rise by five a second later. 

There was then an announcement stating we had to be at a different platform, meaning a lengthily trek over a steep bridge, a difficult task when you have your elderly grandma and cousin with a broken foot. Eventually, 50 minutes later than our arrival at the station, we boarded the train 30 minutes behind schedule. Annoying that the only time we've ever been early for anything in our lives it's delayed. Nothing is ever straightforward, but then again where'd the fun in that be? 
On the train and ready for the day, i started out with a brief wave of excitement, to be followed by a small nap and then a brief period of annoying my cousin by tapping her head continuously. Oh the banter. Then it was time to take cute selfies with my grandma. 
Then we arrived and we were HUNGRY. Food was all we could think about. It took us a long time to navigate our way around and we found ourselves hopelessly wandering with no brunch location in sight. Then we found  a 'tea boutique'. We felt ever so working class. 
One word - AMAZING
After a bite to eat, we had a shop around. Some serious damage was done to my already minimal bank account, after a 5 story primark and a 3 story H&M I have barely a penny to my name. Le cry. 
As I say, I was with my grandma and cousin who has a broken foot. This meant they couldn't keep up with my shopping-adrenaline fuelled speed and lots of pit stops on benches. I wasn't complaining. 
Edinburgh is a lovely place and is great for shopping. However if I see another packet of Westie shaped shortbread ever again I will probably cry, they seem to be on sale everywhere. Who doesn't love a tourist cliché aY? 
After all of that shopping, sitting down and drinking coffee, we felt it necessary to have dinner. We were looking for a cheap and cheerful pizza place, or as I prefer to call it; a shitalian. 
Instead, we found ourselves in what can only be described as the ritz of pizzerias. A place were there was marble spiral staircase to the toilets and portion size is negatively correlated to price (that's a bit of mathematical humour for you all). We ended up here by total fluke. If it was by choice, we'd have been in subway having a sub of the day and a drink for £3. Nevertheless, it was amazing and we all had a giggle at our gateshead  clampit ways.  
I ended my day in the greatest of ways- with a Mars bar. 
BEST. DAY. EVER. 
I really had such a lovely day. 
Emma x

Friday, 24 October 2014

DIY bag and room decor.

Friday night antics. 

Fridays. For me, there's no middle ground - I'm either out until 3am or lying in bed in a onesie with a take away ordered by 5:30. Today, it was the latter. So, with nothing better to do than homework, I did what any good student would do and avoid doing any work at all costs. This evening I decided that I would get a little creative.

As a as level student, I find myself laden down with 40,000 files daily (no exaggeration). So I came up with the solution of carrying my files in a separate bag and using a a smaller bag. Obviously being a cool and urban teen that I am (ha ha ha) I opted for a hessian carrier bag - a must have accessory for all of the cool kids. So this evening was dedicated to jazzing-ing up my bag. 

Ok so, to do this little diy you'll need;
-hessian bag
-buttons
-glue
-glue gun 
-fabric
-cup of tea (optional, but preferred)


I started by organising which buttons I wanted, I then decided I wanted bunting across the front of my bag. 
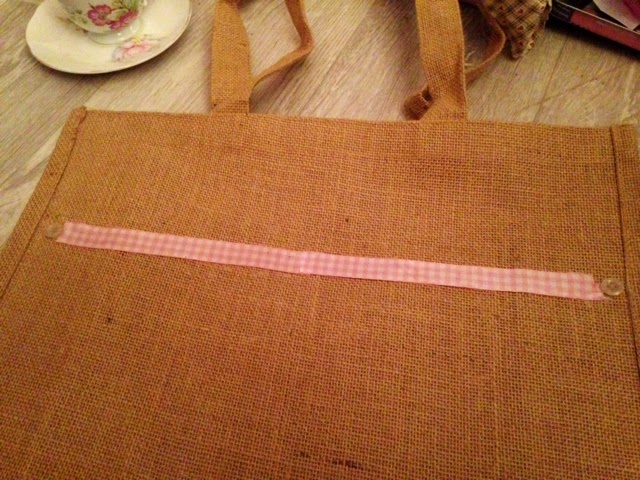
I glued a long strip of gingham ribbon across the top of the bag with a glue stick and hot glued a button either side. 
Next I cut small triangles of the patterned fabric to make the bunting flags and glued them on with a glue stick. 


For extra pazzaz, I used a hot glue gun to add these peace studs. I just thought they were sweet so decided to add them. 
                                     
                                   
Finally, I used the glue stick and stuck this thick strip of mint green lace along the bottom of the bag. 

                                   
                                                                         Ta-da!


Finally, after my bag was finished and I had devoured my chinese takeaway, I decided to creased this lovely little frame for my bedroom wall:
     
I had to improvise slightly for the lettering, but that just gives it character, or so I'm telling myself. 

So here's a little insight to craziness of my Friday night antics, 

Emma x 


Tuesday, 21 October 2014

Autumn is here.


The season of the pumpkin spice latte. 

Crunchy leaves and loafers, what's not to love? For all of the common white girls out there, autumn is a time to unite over the holy grail of coffee consumption- the pumpkin spice latte. 
I am a lover of autumn, as the colder seasons begin to approach, my cardigan envy kicks in. As a lover of all that is knitted, everyone I see in a cardigan leads to my deep rooted desire to purchase all of the jumpers and cardigans in the world. As unfeasible as it sounds, at that moment in time it's a perfectly reasonable demand. 

I refuse to believe anyone could dislike autumn, fairy lights adorn everything and the season of oversized scarves is upon us. My excitement over this is shameless.


That white gal on a budget.
For all we all LOVE a pumpkin spice latte, let's face it- we don't love Starbucks' prices. So, if you also find yourself a psl-lover but rather skint, here's my little recipe for an at home version that tastes just as good;
Take an instant latte sachet, stir in milk, 1 teaspoon of honey, cinnamon & mixed spice to taste. Then add the boiling water and voila, another prime example of budget happiness.


Emma x


Monday, 20 October 2014

Homemade knitted bunting.

<a href="http://www.bloglovin.com/blog/13032199/?claim=e5k7rttt4ur">Follow my blog with Bloglovin</a>

My knitta, my knitta


I do enjoy a good crafty project, who doesn't? As the weather starts to get colder and autumn goes into full swing, I begin to find myself making an endless amount of bunting and adorning everything with fairy lights-not to mention the increased rate of candle burning. All of this is my attempt to make my room feel a bit cosier, considering during most of November/December I'll find myself huddled up in blankets here so I try to make everything as aesthetically pleasing as possible. 

So, here's a little tutorial on how I made this delightful pastel blue knitted bunting.


My knitting knowledge is far from extensive, my skills stretch as far as a simple pattern and the basic ability to cast on and cast off. I wanted this bunting to be mini triangles to they would sit nicely along my shelves (also because I didn't want them to be too technical). 

If you have absolutley no knowledge when it comes to knitting, a basic YouTube tutorial might be of help here, all you need to know is how to cast on and once you can do that, the rest is easy. 

When you cast on, you need to set the wool out in a loop with the needle inside, pull the end until it's tight around the needle; 
Next you need to put ten loops on the needle
And complete one line of knitting. 
Now, complete the next line and on the last loop you drop it, pulling a previous loop over the top of it in order create the angled edges of the bunting. Repeat this after every line until the end loop, tie a knot and cut off excess wool. 

I absolutley love the final result and I think it's the perfect adornment to shelves everywhere. 

I hope this little how-to encourages a few people and isn't too vague. Once you have basic knitting knowledge, you'll understand what I'm trying to explain, but as I myself don't really know what I'm doing, my explaination isn't very clear. Hopefully you enjoy this mini tutorial for my knitted bunting, 

Emma x 


Thursday, 16 October 2014

Autumn make up


The fine line between the kardashiansand the Jeremy Kyle show- one smudge of black too far and you've done it. 

When doing eye make up, recently I find myself going a bit overboard and sometimes I do find myself looking like I have just been punched- let me assure you this is not a good look. I find that there's is a fine line between the overdramatic smokey eye look and the crack whore look. I am tryi to find a balance somewhere nicely in the middle. So if you, much like me, find yourself beginning to resemble the black swan, it's time to come up with a new eye look. So with the help of my trusty naked 2 pallette here's a quick little tutorial on eye make up. 

Ah autumn. The season of leaf crunching, brisk walks, dark mornings, ugg boots and pumpkin flavoured EVERYTHING. A time when collars and jumpers re-surface, I'm almost weak at the knees just thinking of it. Autumn also means the return of my favourite combination- over the top eyes and bold lips. Oh yes, autumn is a time when plum lipstick is smeared across every mouth, and copper eye shadows dabbled over every eye lid. I find myself part of this cliqué, an elite following of autumnal lovers. 


To achieve this highly over the top but always acceptable look, I first applied a highlighting concealer all over my eyelid and undereye. This is a nice way of hiding my undereye bags that just scream sleep deprivation. 
Oh, I don't slack on that concealer. Just an FYI this was before I blended it, I wasn't intending on the phantom of the opera look. 
Next, using my front cover crease brush, I applied the shade tease to the outer half of my lid.
Then using the shade snakebite and my teeny tiny real techniques brush, I lined my eye in a cleopatra-esque flick. That is if cleopatra were a big fan of brown glitter.

Now for my favourite shade. Half baked (insert multiple heart eye emojis here). Urban decay have unlocked the key to my heart with this shade. It is pure gold pigmentation heaven. I applied this to my inner eyelid Again using my crease brush, and blended out with a blending brush. Dreamy. 
Now, I felt the tiniest bit of blackout, blended across my crease, was most necessary.
I also used a detailer brush to line my lash line in blackout as false eyelash prep. 

This is it as far as eye shadow is concerned. Next I cleaned up my brow bone and under eye using concealer and applied my red cherry lashes. The emotions run high when it comes to these eyelashes, I have nothing but praise for them, they are so easy to apply and really great quality. I'm actually getting a bit emotional just talking about them. For £2.89 (eBay), they are such good value. 

Now, after tearing up over half baked eyeshadow and red cherry lashes, I filled in my eyebrows with the seventeen brow box and highlighted my brow bone with the shade foxy.

After I applied the rest of my makeup, 


This was the finished result:
I was more than pleased with this eye makeup, for me this is a good solution to my eye makeup woe. 

Hopefully this helps anyone else struggling to define and eye look between kim kardashian and a black eye. 

Emma x